CLS700 Not Printing
This knowledge base article shows you what steps to take when your CLS700 is not printing on your components. Which includes common issues with your power supply, maintenance and print head cleaning or solutions for plate media.
No Power Or LED Lights

Check the cables are connected and powered on
If your CLS700 is not printing and the lights remain off on the control panel, check the power is turned on and all the cables are connected. Check the cords for signs of damage, and if so replace them before you try to use the printer again. Check the fuses and power to the socket or your building. Finally check the USB connection to your PC, after all it can’t print something it’s not receiving.
Not Printing
When reflective is feeding through the machine but nothing is being printed, there are a few things for you to check. Start by checking your print head is clean and in working order, Then see there’s nothing stuck and preventing the printing unit from operating correctly. Finally check the feed path, a damaged platen roller won’t pull media through for printing.
Dirty Print Head

Is the print head clean & functioning
Check the print head on the bottom of the print unit for dust and contamination. If it’s dirty or blocked, follow this print head cleaning guide to clean it correctly. If you’re having to clean it frequently, consider re-locating your plate production to a clean, dust free location and only use approved ribbons.
Stuck Media
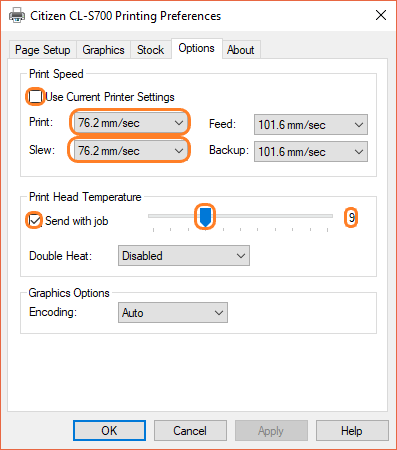
Are high temperatures causing jams?
Over time bits can become stuck to the print head, this usually happens when temperature settings are set too high. To fix this you need to clean the print head and then reset the printers settings.
Start by removing the printers top cover, then push the blue lever to release the print unit. Lift it up and check the print head on the bottom for any contamination. Carefully pull away any visible pieces before wiping it with a cloth or cleaning pen. Finally check the print head temperature by altering your settings to those shown in the image above.
Dirty or Damaged Platen

A dirty platen may struggle to pull media through the print unit
The Platen at the front of the printing unit is used to pull components through the machine. Dirt and contamination can prevent it from operating correctly. Clean a dirty one with alcohol swab, and ensure you’re only using approved ribbons. If the Platen is deformed or has been damaged in some way, it will need replacing with a new one – contact technical support for assistance.
Printing Pressure or Alignment

Check the adjustment controls are set correctly
We’ve set up your printer to apply equal pressure, right across the print area. This means the print head works right across the width of your components and only puts down the right amount of ink.
But if you’re getting regular issues you should check your media alignment and print controls. This is a more advanced task, so check your user guide for the exact settings or contact our technical support for assistance.
- A: Media Thickness Screw – Adjust the print unit offset to match components thickness.
- B: Media Thickness Indicator – Window & markings for fine tuning the thickness settings.
- C: Media Width Knob – Adjusts the printing pressure until it is equal across the components width.
- D: Media Width Indicator – Window & markings to fine tune the printing area.
- E: Print Unit Lever – Opens the print head unit for raising it up to replace ribbons or media rolls.
- F: Sensor Arm Lever – Releases the sensor arm, so it can be raised when fitting media rolls
Need Help?
For detailed instructions, try your number plate system’s user guide. Or for more help contact our customer service team. And remember you can order Cleaning Pens or Alcohol Swabs from our online NP-Shop.