CLS700 Printer Errors
This knowledge base article shows you the common CLS700 Printer Errors encountered when using this printer for producing number plates. When your printer detects a problem, its control panel lights up to indicate the issue. But being a simple machine, any problem can easily be found and fixed. Below you will find common errors listed alongside their solutions.

Errors are displayed on the control panel
Paper mentioned throughout this article refers to any type of compatible media. If you have any other error please check your guide or the manufacturers website before getting in touch.
Print Errors
When your CL-S700 Printer detects a problem it sounds an alarm and flashes its lights. And the LCD displays a short message to identify the problem. The table below identifies a range of common problems you may encounter.
Note: Silence the printers alarm by pressing the stop button.

Here’s how common errors are shown
Troubleshooting Errors & Alarms
Once you know what problem you have, you can then start to put it right. The troubleshooting information below, shows how to fix common problems found when using these printers.
Abnormal Head Temperatures
Overheating issues can usually be solved by providing adequate ventilation and spacing around the printer, see the operating conditions guide. If you are getting abnormal print head temperatures first ensure the print head is clean. Then check the temperature settings in the printer preferences are set to the correct values as shown in the image below.
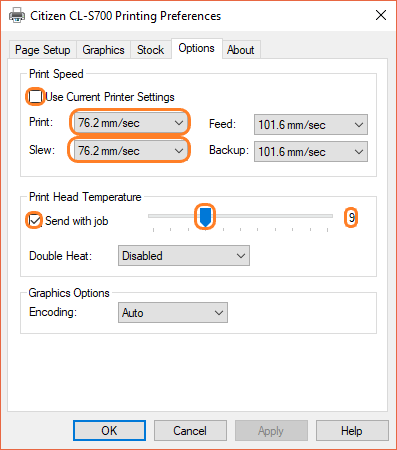
Adjust your print head temperature
Head Open
Head open alarms can occur when the print unit has not been locked down correctly, this can stop printing operation. Open the top cover and push down the print unit until it clicks and locks into place. If it fails to close correctly check for any jammed media. Replace the printers top cover when finished.
Ribbon Errors

Check your ribbon is seated correctly and is wrinkle free
Replace a ribbon when fitting a new roll or when the end of the ribbon is detected by the printer. Or in the case of a false positive, check the cores are fitted properly and check tension settings.
Ribbon issues occur when they have not been installed correctly or are twisted and wrinkled. Always ensure the winding cores are fully inserted and are configured as outside wound or ink out. A loose or wrinkled ribbon will require the cores tightening to remove creases and any slack. Check the media alignment controls for incorrect settings, refer to your manual for your values.
Media Errors

Ensure your print head is clean and guides set correctly
The simplest media problem is when the printer detects it’s empty, simply re-stock the machine with fresh components to solve this. Media jams occur when reflective panels stick to a dirty print head or aren’t feeding through the mechanism properly. Clear media jams on the printer by pulling them clear, then clean the print head and media path.
When loading a new roll, use the feed button on your control panel to move to the start of a panel. Always ensure your rolls sit flush against the side guide on the media bar. And position the media guides so they sit just either side of the reflective panel. After all, they help it to feed straight through the print unit.
Need Help?
Please refer to your Core Systems user or manufacturers guide for more up-to-date information. Or for assistance contact our customer service team for help. And remember, you can order Cleaning Pens or Alcohol Swabs from our online NP-Shop.