This knowledge base article is a quick Reflective Number Plate Assembly Guide using a roller jig.
You produce a Reflective Number Plate by laminating a printed dry reflective sheet under a clear acrylic face. Our British Standard certification includes number plates made with this specific plate media combination. So we can guarantee number plates made from them will be road legal, subject to correct use.
Video Guide – Reflective Number Plate Assembly
Reflective Number Plate Assembly
When assembling a printed number plate, we recommend using a jig and roller for a professional finish. The jig pins are used to line up media accurately & consistently. And the rollers apply equal pressure across the entire width, helping the adhesive to bond evenly. Below is a quick step-by-step guide to Reflective Number Plate Assembly.
Place Your Dry Reflective on the Jig

To start, place your jig in a well lit, clean and warm work area. Use the pins and place your printed dry reflective face up on the jig. Ensure it’s positioned flat and square.
Peel Back & Crease the Adhesive Cover
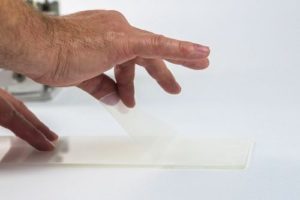
Next, you’ll stick a clear acrylic face above the printed reflective. So, fold back a few centimetres of the adhesive cover at the right side of the acrylic. Create a crease in the cover to stop it from slipping back onto the exposed adhesive.
Join the Acrylic Face & Reflective
Now line up the Acrylic face with the adhesive side facing down, towards the reflective. Use the pins to help ensure the sides all match up. Carefully join them together at the exposed adhesive end, by running your finger lightly down the edge.
Roll and Bond Them Together
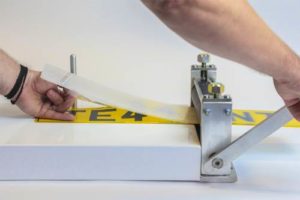
Slide both parts towards the rollers, with the joined edge nearest. Take and keep hold of the folded adhesive cover on the Acrylic Face. Slowly wind the Jigs arm, so the components are fed through. The adhesive cover should pull off while the rollers bond the parts together.
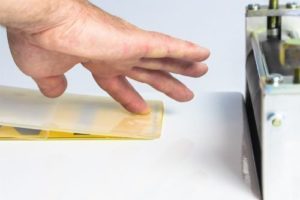
Remove the Acrylic Faces Cover

Finally, remove the protective cover from the Acrylic Face’s non-adhesive face. Remember to wait a few minutes after assembly, for the glue to cure before handling or fitting to a vehicle.
Reflective Number Plate Specification
We hope this Reflective Number Plate Assembly guide & YouTube Video provides a quick refresher. Try this Reflective Number Plates Article for more details on the plate components, its specification & recyclability.