In this article
C532 Printer Errors
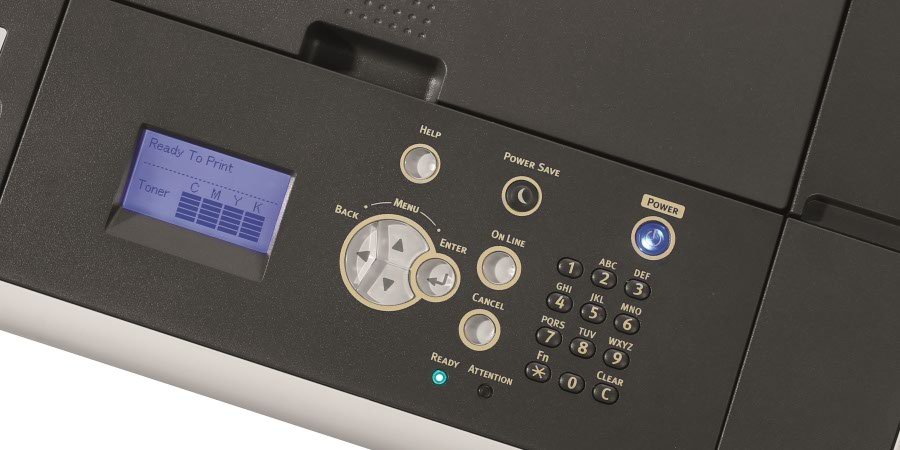
This knowledge base article shows you the common C532 printer errors encountered when using this model for producing number plates. When a problem is detected the attention LED on the control panel will light up and the display screen will say what type of error it is or indicate an error code. Paper mentioned here refers to any compatible media type.
If you have an alternate error please check your printer guide or manufacturers website before getting in touch.
C: Cyan (blue), M: Magenta (red), Y: Yellow, K: Black.
Toner Errors
| Error | Code | Description |
|---|---|---|
| [COLOUR] Toner Low | 410, 411, 412, 413 | The toner colour indicated on the screen is low. Have a new cartridge ready. |
| [COLOUR] Waste Toner Full. Replace Toner. | 415, 416, 417 | Waste toner is full. Replace the indicated toner cartridge. |
When the printer detects an empty cartridge, it will state on its display screen which colour needs replacing. Changing a toner cartridge is a easy end-user task, if you need help take a look at this article on how to replace a C532 Toner Cartridge.
Drum Errors
| Error | Code | Description |
|---|---|---|
| [COLOR] Image Drum Life. [PAGES] Pages Left | 564, 565, 566, 567 | The image drum indicated on the screen reaches its lifetime. Replace the image drum with a new one. |
| Install New Image Drum. Image Drum Life. [COLOUR] | 350, 351, 352, 353 | The image drum indicated on the screen reaches its lifetime. Replace the image drum with a new one. Opening and closing the cover can resume printing for a while. |
| Install New Image Drum. Printing disabled due to low threshold of Image Drum life. [COLOUR] | 680, 681, 682, 683 | Printing has stopped because the image drum indicated on the screen reached its lifetime. Replace with a new image drum to print. |
| Install New Image Drum. Image Drum Life. [COLOUR] | 560, 561, 562, 563 | The image drum indicated on the screen reaches its lifetime. Replace the image drum with a new one. |
| Image Drum Sensor Error [COLOUR] | 540, 541, 542, 543 | A toner sensor error has occurred in the drum indicated on screen. Uninstall the image drum, and then install it again. If the message persists, uninstall the toner cartridge and install it again. If the toner cartridge is not installed, install it. |
When the printer detects a drum needs changing, it states on the display screen which colour needs attention. The printer may even cease the current print job due to drum issues. Changing a drum unit is a basic end-user task, take a look at this article on how to Replace C532 Drums for help.
If you’re getting drum sensor errors, first try taking the drum out of the machine and try installing it again. Alternately, this error may occur if the toner cartridge isn’t fitted correctly. Try taking it off and on again.

Media Errors
| Error | Code | Description |
|---|---|---|
| Install Paper. MPTray. | Print on paper fed manually. Load paper in the MP tray. Check the paper detection sensor lever is lowered. | |
| Check Paper. Paper Size Error [TRAY] | 400 | Paper size error has occurred in the indicated tray. Make sure that the size of paper loaded in the tray matches the [Paper Size] setting set on the operator panel. Load paper according to the paper size and direction set. If the setting made on the operator panel is wrong, cancel printing first, set the right paper size from [Paper Size] on the operator panel, and then print again. Make sure that the cassette does not feed multiple sheets of paper at a time after starting printing. If it happens, remove paper, and then load paper correctly. |
| Change Paper in MPTray. [MEDIA_SIZE] [MEDIA_TYPE] | 460 | The size and type of paper loaded in the MP tray do not match those indicated on the screen. Make sure that the size and type of paper loaded in the MP tray match those selected on the application. |
| Change Paper in [TRAY]. [MEDIA_SIZE] [MEDIA_TYPE] | 461, 462, 463 | The size and type of fed paper do not match those indicated on the screen. Use the same size and type of paper. |
| Install Paper/Media. [TRAY] [MEDIA_SIZE] | 490, 491, 492, 493 | No paper or media is loaded in the indicated tray. Load paper & media of the displayed size. Load a small stack of media rather than single sheets. Check the detection sensor lever is being lowered by the media. |
| Install Paper Cassette. [TRAY] | 440, 441, 430, 431, 432 | The tray is not installed. Install the cassette. If the cassette is already inserted, pull it out, and then insert it again. |
The OKI C532 will inform the user when it encounters a variety of media related problems. Most messages will be about empty trays or incorrect paper size, fix these by re-filling with paper or media of the right size.
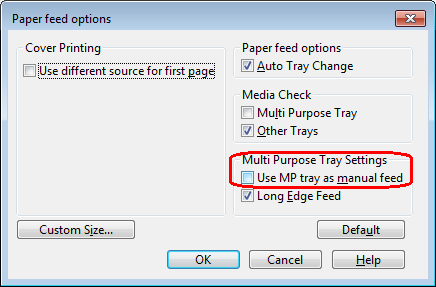
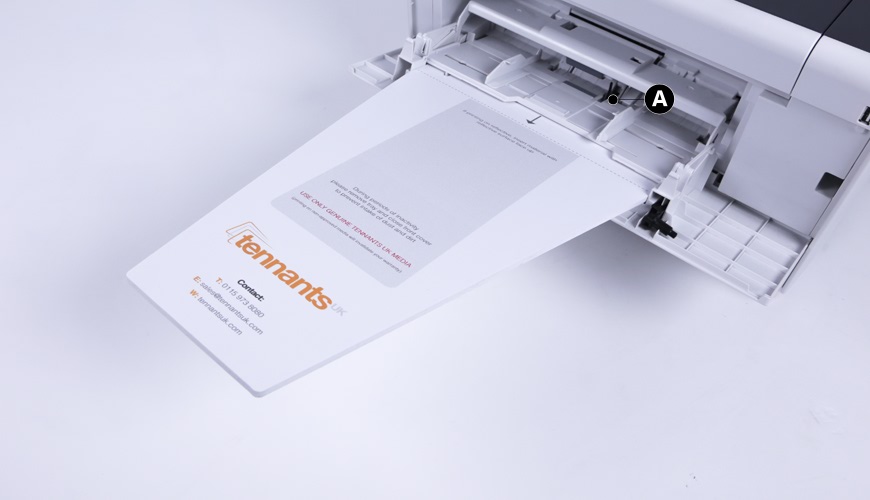
When printing number plates, make sure your default settings or printer preferences are set to use multipurpose tray as manual feed (image above). If printing doesn’t start (error code – 490), check the black paper detection sensor lever (A) located on the right side of the paper feed roller is lowered (image below). Load a stack of plate media instead of single sheets, the idea is to lower the sensor using the media’s weight.
Paper Jam Errors
| Error | Code | Description |
|---|---|---|
| Open Cover. Paper Jam. Output Tray | 370, 371, 372 | A paper jam has occurred inside the machine. Open the output tray and remove jammed paper. |
| Open Cover. Paper Jam. Output Tray. | 380, 381, 382, 383, 385, 389 | A paper jam has occurred inside the machine. Open the output tray and remove jammed paper. |
| Open Cassette. Paper Jam. [TRAY] | 391, 392, 393 | A paper jammed via the paper feed path from the indicated tray. Pull out the cassette, and then remove paper. If multiple sheets of paper are fed at a time, remove paper and reload paper. Make sure that the paper stoppers are set in the right position. |
| Open Cover. Paper Jam. Output Tray. | 390 | Paper jammed via the paper feed path from the MP tray. If the edge of the jammed paper is not visible, open the output tray and remove the paper. |
For output tray jams, simply open up the target tray and pull any stuck media free.
Need Help?
For more detailed instructions, try your printers onscreen help. Or take a look or your number plate systems user guide.