C532 Overview
Here’s the C532 Overview, we’ve used these LED printers for Trade Systems because they can make number plates of every size and shape. This page highlights the important parts and locations on the OKI printer. Refer to this page when troubleshooting or to find out what a part is called.
Video – C532 Number Plate Printer
 C532 Number Plate Printer- YouTube Popup
Front & Top View
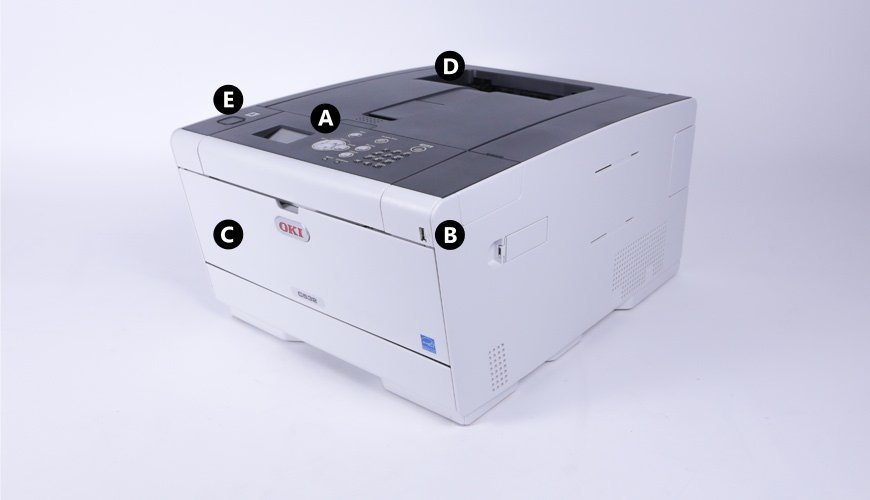
The front of your OKI C532
The section below shows the front and top of your number plate printer. This is where most interaction with the machine occurs..
- A: Control Panel – Adjust settings and controls the printer menu.
- B: USB Port – Port for loading USB memory sticks.
- C: Multipurpose Tray – Input point for loading number plate components.
- D: Top Output – Printed film components emerge here.
- E: Top Button – Opens up the top cover.
Rear View
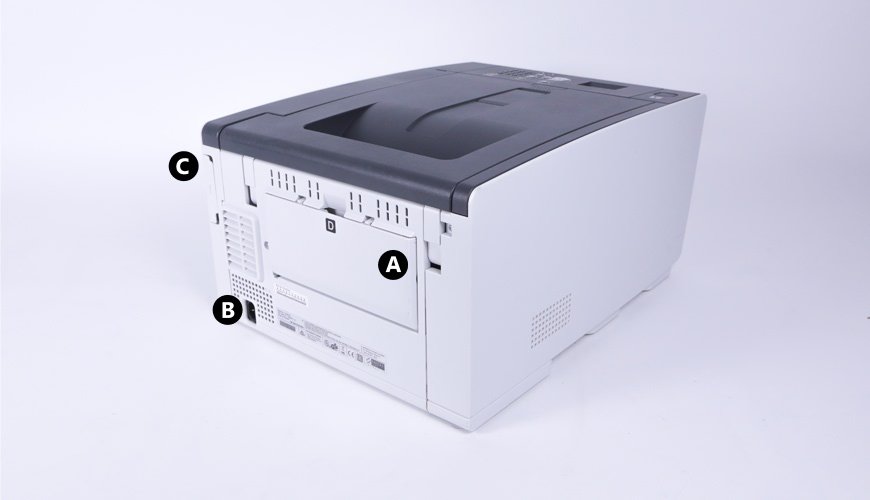
Rear view of a C532 printer
The rear of the printer is where your printed reflective sheets emerge. In addition it houses the interface and mains power ports.
- A: Rear Output – Printed reflective components emerge here.
- B: Power Socket – Mains power cord socket.
- C: Interface Cover – Contains the USB & Ethernet cable ports.
Control Panel
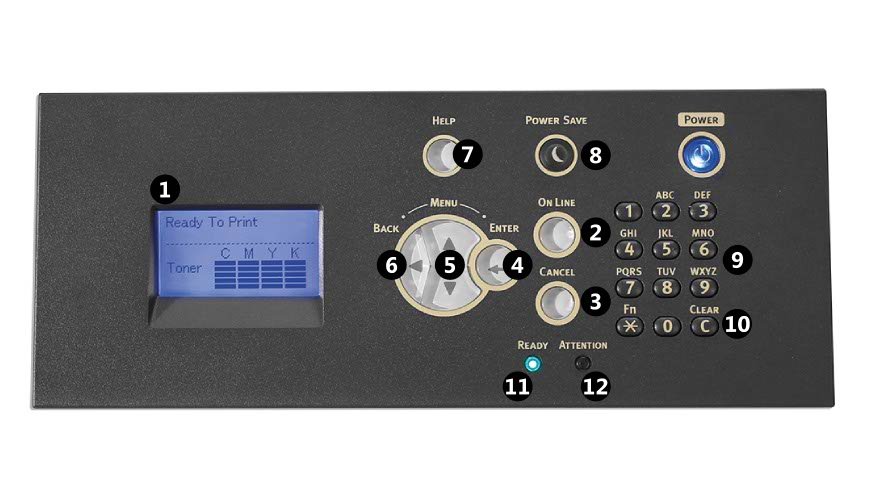
Close-up of a C532 printers control panel
The control panel is where you interact with the printer, with options to begin, pause and stop operation. And the display screen will provide error codes and self help guides to keep you productive.
- 1: Screen – Displays printer status and menus.
- 2: Online – Toggles the online or offline status.
- 3: Cancel – Stops the current print or quits menu option.
- 4: Enter – Sets an option or selects a menu item.
- 5: Option Controls – Cycle up and down menu choices.
- 6: Back – Return to the previous screen/menu.
- 7: Help – Toggle to display the printer help service.
- 8: Power Save – Lights green when saving energy, flashes when sleeping.
- 9: Numeric Keyboard – Enter numbers or alphabet characters.
- 10: Clear – Clears an entered value.
- 11: Ready Indicator – Green LED to indicate online or offline status.
- 12: Attention Indicator – Orange LED to indicate error status.
Internal
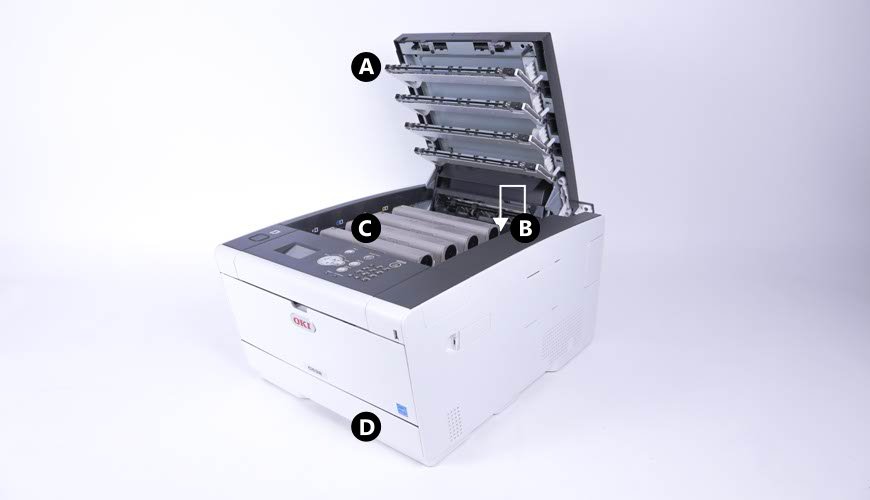
The C532 LED heads are underneath the printer top cover
Inside the top cover you find the LED heads and underneath them, your toners, drums and fuser unit. All of these consumables can be replaced when reaching their end of life.
- A: 1 of 4 LED Heads – Light source for the printing unit.
- B: Fuser Unit – Toner fusing unit, used to apply toner onto components.
- C: Toner Cartridges – CMYK toners fitted on top of drum units.
- D: Tray 1 – Main A4 paper tray.
Need Help?
This is a basic overview of the OKI C532 Number Plate Printer. Please refer to your user guide for more up-to-date information. If you’ve an account, you can order replacement C532 Consumables from our online NP-Shop.
Our knowledge base contains articles with details on replacing this printers toners, drums and clearing simple media jams. Not to mention how to use our plate media and approved printer settings. And has solutions to common number plate print issues and printer errors.