This knowledge base article is all about our Reflective Number Plates. Otherwise known as 2-Part Reflective after its components and the printed media. Below is an overview of its specification, sections on its components, printed media, assembly & recyclability.
Reflective Number Plates / 2-Part Reflective
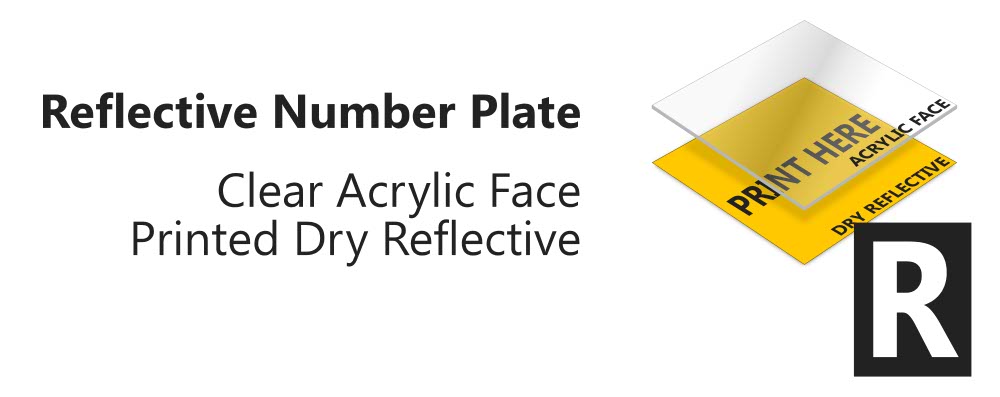
Our Reflective Number Plates – 2-Part Construction
Overview
To produce Reflective Number Plates you laminate a printed Dry Reflective panel underneath a clear Acrylic Face. This 2-Part construction is the standard and the simplest method used across the industry. Dry reflective is also easier to convert into roll-fed media, since it doesn’t require backing paper. The Oralite film we utilise for our dry reflective is designed for printed signs.
Reflective Number Plates are covered by our BSAU 145e Certification. So we can guarantee number plates made from this specification will be road legal, subject to correct use & assembly.
Our Components
Tennants Reflective Number Plates specification requires printed dry reflective be mounted below a clear acrylic face.
Clear Acrylic Face
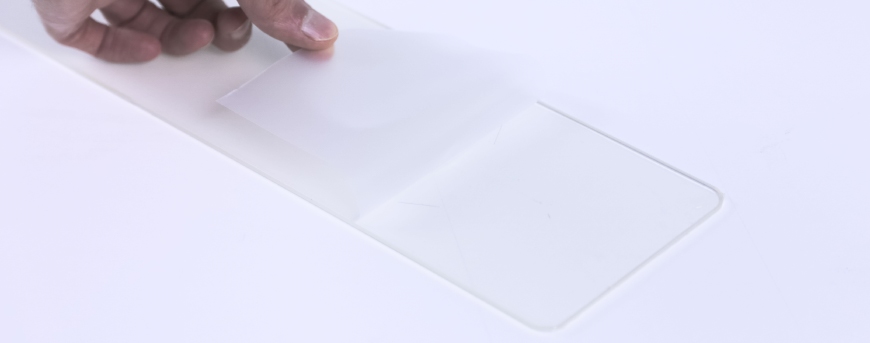
Folding Back the Cover on Clear Acrylic
Our Clear Acrylic Faces are 3mm thick PMMA panels that provide excellent strength and durability. Just like our other components it’s UV stable to resist clouding-up and discolouring over time. Moreover it’s easy to fabricate, bonds well with adhesives and delivers glass-like opacity. This range of features make it a perfect protective component for compliant number plates. For quick assembly, it’s finished with a high-tack adhesive coating protected by a quick release cover.
Dry Reflective
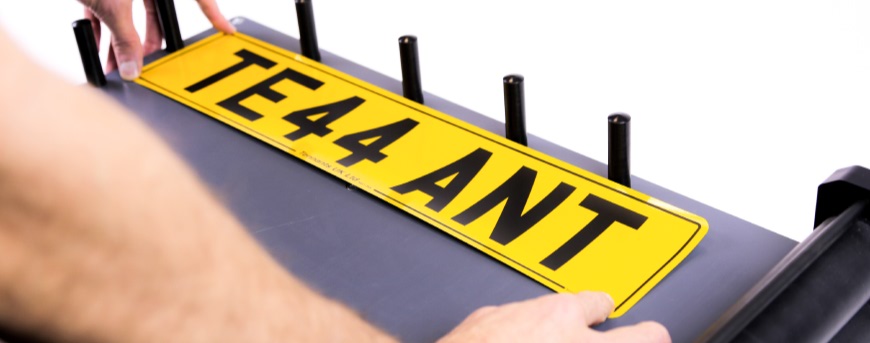
Printed Dry Reflective on a Jig
Tennants Dry Reflective is essentially a 0.5mm thick Oralite film, specially made by Orafol. Oralite is perfect for our plates, being retroreflective, UV stable & fade resistant. This ensures the legally required colour and reflectivity levels are met for the number plates lifespan. In addition, it’s finished with a layer that provides superior bonding when you print onto it.
Printed Media
Printing onto Dry Reflective allows suppliers to quickly produce standard number plates. The material provides both the colour and visibility levels required by regulations. Most number plate systems print black only, since colour reproduction is an issue on yellow backgrounds. Being thicker than clear film, reflective is easier to handle and more robust. Its tolerance to heat makes it suitable for a greater range of printing methods, besides thermal. This makes it easier to perforate and form into rolls, streamlining on-site production.
Plate Assembly
Here’s a quick step-by-step guide on how to assemble a number plate. Reflective Number plates are made by laminating printed reflective under a clear face. This simple process enables suppliers to produce number plates on-demand. Using on-site systems comprised of specialist printer, plates software and blank components.
When assembling a printed number plate, we recommend using a jig and roller for a professional finish. The jigs pins are used to line up media accurately & consistently. And the rollers apply equal pressure across the entire width, helping the adhesive to bond evenly.
- Use the pins and place your Printed Dry Reflective face up on the jig, positioned flat and square.
- Now fold back a few centimetres of the adhesive cover on a Clear Acrylic Face.
- Line up the Acrylic on top, with the adhesive facing down towards the jig.
- Carefully join the components together at the exposed adhesive, ensure the edges match.
- Next slide both parts towards the rollers, with the joined side nearest.
- Take and keep hold of the folded adhesive cover on the acrylic face.
- Slowly Wind the arm so the components are fed through the roller.
- The adhesive cover should pull free, while the roller bonds the parts together.
- Finally, remove the other protective cover from the Acrylic Face.
Recycling
Reflective Number Plates utilise solid PMMA acrylic which is non-toxic, biocompatible & recyclable. In solid form it’s naturally compatible with human tissue and been used for glasses, dentures & bone replacement. Recycling acrylic is possible but is more challenging than other types of plastic. Special business recycling centres will accept it, if household services refuse.
PMMA is a polymer, so to be recycled it needs to go through a process of depolymerisation. But first it needs to be cleaned and stripped of any contaminants. This means the reflective sheet is ground off and discarded as industrial waste. The remaining acrylic flakes or pellets are then depolymerised, using heat and materials to separate it into 98% pure monomers. And it’s this monomer resin that’s used to create new products.