Loose And Wrinkled CLS700 Ribbon
This knowledge base article shows you how to correct a loose and wrinkled CLS700 ribbon on your number plate printer. Perform this task every time you replace a ribbon or load fresh reflective rolls on your printer. For the best print performance check your ribbon every time you start a production run.
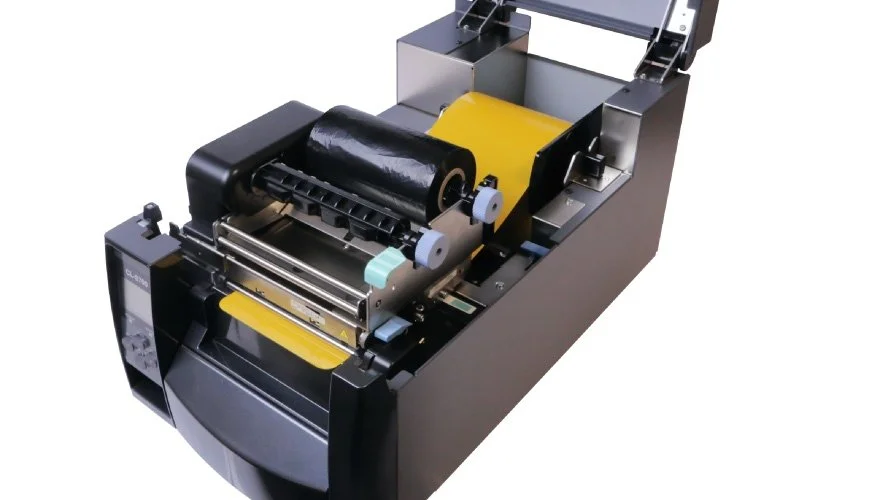
You will need to access the inside of the printer to correct a loose and wrinkled ribbon. Before you start, ensure the power is turned off, then open up the top cover.
Raise Print Unit

Lift up the print unit to access the ribbon
For ease of access and to release tension, you will need to raise the print unit and ribbon up. To release the print unit (A) and ribbon holder, push the large headed blue lever (B) and lift it all the way up. Just leave the sensor arm where it is. Now you can start to fix your loose or wrinkled ribbon.
Tweak Ribbon & Winding Cores

Tweak the cores to remove and wrinkles and creases
The easiest way to get rid of wrinkles is tweaking the two cores. Start on the winding side and rotate the blue knob backwards and forwards. Simply jiggle it to remove any slack and wrinkles from the exposed ribbon. Repeat with the ribbon side if required until all your wrinkles have gone.
Lower Print Unit & Install Media
After setting the media guides lower the print unit
Once you’re happy the ribbon is wrinkle free, you’ll need to lower the print unit and set-up your components. Lift up the sensor arm and fit a reflective roll, pulling a panel through the media guides. Check the guides so they’re in their correct positions, just wide enough for the reflective. Now lower the sensor arm and print unit down until they click and lock into place.
Turn on the printer and when ready push the feed button on the control panel, this will tighten up the ribbon and print mechanism. Since you’re using rolls, it will also feed a panel through the mechanism until it reaches the next start position. Close the top cover when you’ve finished.
Check Media Alignment Controls

Check the media alignment settings are correct
If you’re still getting print issues after tweaking the ribbon, check your media alignment controls. This is a more advanced task, so check your user guide for the exact settings or contact our technical support.
- A: Media Thickness Screw – Adjusts print unit offset to match media size
- B: Media Thickness Indicator – Window & markings for fine tuning
- C: Media Width Knob – Adjusts print unit pressure to match media width
- D: Media Width Indicator – Window & markings to fine tune print area
- E: Print Unit Lever – Opens or locks print head unit
- F: Sensor Arm Lever – Releases or locks the sensor arm
Need Help?
For detailed instructions, try your Core Systems user guide. Or for help with your plate media contact our customer service team. And you can order replacement CLS700 Consumables from our online NP-Shop. There we list black ribbons and reflective rolls alongside head cleaning pens and alcohol wipes.